
Tools
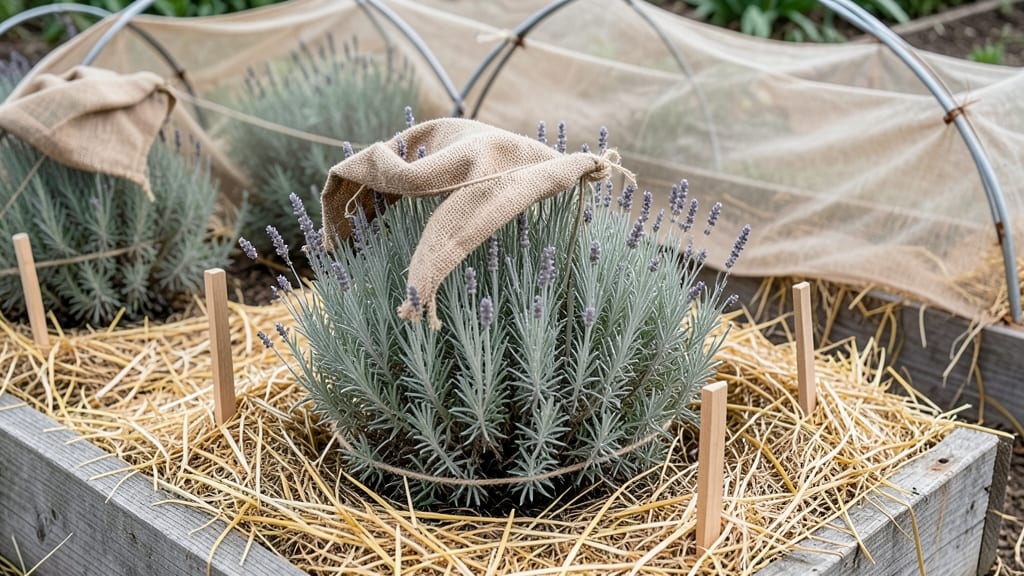
Winter protection for your garden is the key to saving your plants and ensuring a strong spring comeback.
Frost damage can turn your thriving garden into a winter wasteland—but with the right layered protection, you can shield your plants and extend their growing season well into the cold months.
Whether you’re dealing with Zone 6a’s first frost or late-season freezes, the difference between a bare ground and a thriving garden often comes down to preparation.
From mulching to frost blankets and DIY tunnels, there are simple, cost-effective ways to insulate soil, roots, and stems without breaking the bank. The best part? Many of these methods take just 30 minutes to set up before the first freeze hits.
Below, I’ll walk you through the most effective winter protection strategies—whether you’re a beginner or a seasoned gardener looking to refine your approach. Let’s keep your garden alive through the cold!
Layered winter protection techniques for different plant types
Winterizing your garden isn't a one-size-fits-all task—different plants need customized protection to survive freezing temperatures. The key is using layered protection, combining passive methods like mulch with active solutions like heating cables. This approach creates a microclimate that shields delicate plants while allowing hardy perennials to rest naturally.
Start with the soil foundation. Cold temperatures penetrate the ground first, so insulating the soil with organic mulch (like straw or leaves) is your first line of defense.
For tender perennials, add a 3-4 inch layer of mulch after the ground freezes but before heavy snowfall. This prevents frost heave and preserves root integrity.
For annuals and delicate plants, passive protection alone may not suffice. That's where active measures like row covers or cloches come in. These create a physical barrier against wind and frost, trapping heat from the sun.
Apply frost blankets when nighttime temperatures drop below 28°F, and secure them tightly to avoid gaps.
Here’s how different plant types benefit from layered protection:
For extreme cold snaps, consider adding a third layer like a clear plastic tunnel or snow cover. Shovel snow onto plants (except evergreens) to create natural insulation—just avoid piling snow directly on woody stems or succulents, which can rot.
Timing is critical. Apply mulch in late fall (after soil freezes) and active covers in early winter when nighttime temps drop below 30°F. Monitor forecasts and adjust layers as needed. For example, remove row covers during the day to prevent overheating, but replace them at dusk.
Don’t forget about watering before winter. Deep watering in late fall helps plants store moisture for dormancy. Avoid overwatering, though—wet soil freezes faster than dry soil. For potted plants, move them to a garage or insulated shed and wrap containers in bubble wrap to prevent cracking.
Pro tip: Use reflective mulch (like aluminum foil) around bare soil to reflect sunlight and warm the ground. Pair this with a windbreak made of bales of straw or evergreen branches to shield plants from drying winter winds.
These small adjustments can mean the difference between frost damage and spring revival.
Layered protection isn’t just for winter—it also extends your growing season in early spring. By mastering these techniques, you’ll give your garden a head start and healthier regrowth when temperatures rise again. Start experimenting this fall, and watch your plants thrive year after year!
DIY vs. store-bought winter protection: cost-effective solutions for every budget
When winter’s first frost threatens your garden, you face a critical choice: DIY winter protection or store-bought solutions.
Both have merits, but your budget, time, and plant types will determine the best path. Homemade options like straw bales or cardboard tunnels offer zero-cost solutions, while commercial frost blankets provide superior insulation and convenience.
Let’s break down the pros and cons to help you decide what works best for your garden’s needs.
DIY methods shine for gardeners on a tight budget or those with limited space. Straw bales act as natural insulation, while cardboard tunnels create microclimates that trap heat. The best part? These materials are often free or inexpensive and can be repurposed from household waste. However, they require more effort to set up and may not last as long as commercial products. For example, cardboard breaks down after a few freeze-thaw cycles, needing replacement mid-season.
On the other hand, store-bought winter protection delivers durability and ease of use. Frost blankets (like Agribon or Reemay) provide consistent coverage and can be reused for years. Hoop houses or greenhouse tunnels offer long-term protection for delicate plants like tomatoes or peppers, extending their growing season by weeks or even months.
The trade-off? These solutions come with a higher upfront cost, typically ranging from $20 to $200 depending on the scale of your garden.
Here’s a quick comparison to help you weigh your options:
DIY Winter Protection
Store-Bought Winter Protection
- Zero or low cost (repurposed materials)
- Eco-friendly (biodegradable options)
- Customizable to fit any garden size
- Less durable (breaks down over time)
- Requires more effort to set up
- Limited insulation compared to commercial products
- Long-lasting durability (reusable for years)
- Superior insulation (better frost protection)
- Easy to use (quick setup and removal)
- Higher upfront cost ($20–$200+)
- May require assembly (hoop houses, frames)
- Less eco-friendly (plastic-based materials)
For small gardens or tight budgets, I recommend starting with DIY solutions like straw mulch or cardboard collars around tender plants. These work wonders for herbs, lettuce, and young seedlings and can be combined with row covers for extra insulation.
If you’re protecting larger plants or high-value crops, investing in frost blankets or a mini greenhouse will pay off in healthier plants and extended harvests.
For example, a $50 hoop house can protect tomato plants from 20°F temperatures, while a $10 straw bale might only shield them down to 28°F.
Hybrid approaches work too! Use DIY mulch as a base layer and top it with a reusable frost blanket for maximum protection. This combo balances cost savings with effectiveness, making it ideal for medium-sized gardens. Just remember to remove covers during the day to prevent overheating and fungal growth. A little planning goes a long way in keeping your garden thriving through winter—no matter your budget.
🌱