
Picking
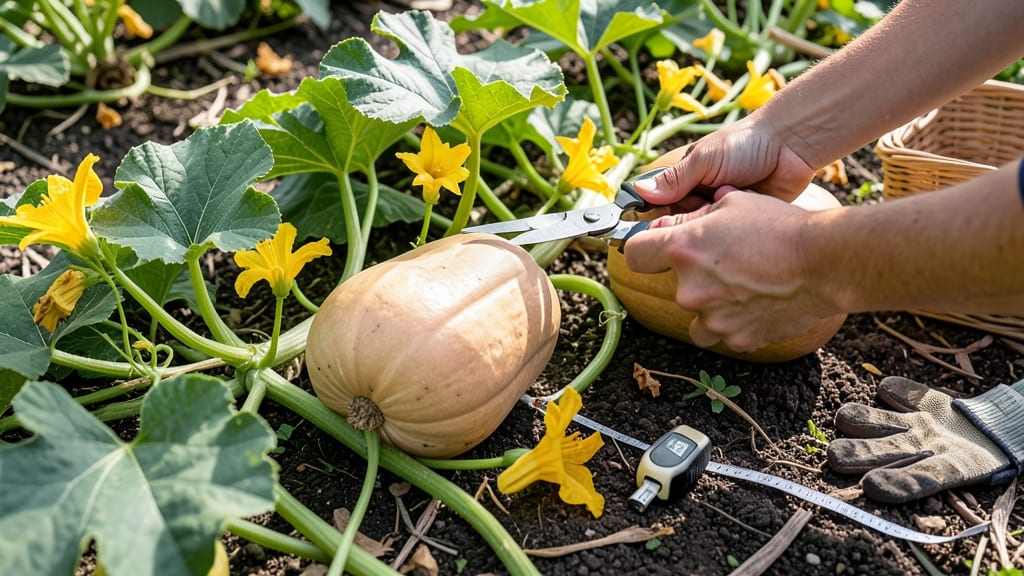
To pick butternut squash from your garden at the perfect moment means waiting for a hard rind, a dried stem, and that signature deep tan color 🎃 — not a second too soon or too late.
Butternut squash is a garden favorite—but picking it too early or too late can ruin your harvest. Miss these key signs, and you might end up with bland, seedy, or even rotting squash. The difference between a flavorful squash and one that’s past its prime comes down to timing.
Most varieties mature in 85–100 days, but regional climates and planting dates shift that window. In USDA Zone 6a, for example, late-spring plantings may need extra weeks before the first frost hits. Here’s how to test readiness for peak flavor and storage life.
You’ll learn the three foolproof ripeness indicators, seasonal adjustments, and how to avoid common mistakes that turn a great harvest into a disappointment. Let’s get started.
3 Visual clues your butternut squash is ready for harvesting
Harvesting butternut squash at the right time ensures sweet, flavorful flesh and longer storage life. Unlike some vegetables, these squash don’t ripen further after picking—so timing is everything. I’ve learned that ignoring these visual cues can lead to tough skin, bland taste, or even rot.
The good news? You only need to watch for three foolproof signs to know when your squash is ready.
First, let’s talk about the color transformation. A ripe butternut squash changes from green to a rich, creamy tan or beige. This isn’t just a surface detail—it’s a sign the sugars inside have fully developed.
I’ve seen gardeners pick too early because the squash still looks green, only to regret it when the flavor falls short. The color shift is your first green light to check the other two clues.
Next, focus on the stem condition. When your butternut squash is ready, the stem near the fruit will dry out and shrink. It should look brown and papery, almost like it’s detaching naturally.
If you gently tug and the stem pulls away easily, that’s a great sign. I’ve found that stems that stay green and flexible mean the squash needs more time—sometimes weeks—to reach peak ripeness.
Finally, examine the skin texture. A ripe butternut squash has a hard, dull rind that resists pressure when you press your fingernail into it. If the skin gives slightly or feels soft, the squash isn’t ready yet.
I learned this the hard way when I picked a squash with slightly soft skin, only to find it was still growing and the seeds were underdeveloped. The harder the skin, the better the flavor and storage potential.
🌱 3 Visual Clues Your Butternut Squash Is Ready
- 1. Color Change: Skin turns from green to creamy tan or beige. This indicates full sugar development.
- 2. Stem Drying: Stem near the squash shrinks, turns brown, and feels papery. Tug test: if it pulls away easily, it’s ready.
- 3. Hard Rind: Skin is tough and dull, not shiny. Press your fingernail—if it doesn’t dent, it’s harvest time.
Pro Tip: Combine all three clues for peak flavor and storage life. A squash with one or two signs may still need time.
Here’s a bonus trick I use: tap the squash. A ripe butternut will sound hollow when tapped with your knuckles. This hollow sound means the seeds are fully developed and the flesh is at its sweetest.
I’ve used this method for years, and it’s saved me from picking squash that wasn’t quite ready. It’s a quick, non-destructive way to double-check your other observations.
One common mistake I see is harvesting based on size alone. Some gardeners think bigger means better, but that’s not always true. A squash can grow large but still be underripe if it lacks the other two signs.
I’ve had 10-pound butternut squash that tasted bland because the skin was soft and the stem was still green. Always prioritize the visual cues over size—flavor and texture matter more.
If you’re in a cooler climate, like USDA Zone 5 or 6, you’ll need to act faster. First frost can sneak up quickly, and butternut squash won’t survive freezing temperatures.
I’ve had to harvest squash slightly earlier in these zones, even if they weren’t perfectly ripe, just to avoid frost damage. In warmer zones, you have more flexibility, but don’t wait too long—the squash can overripen and develop rot.
Once you’ve confirmed all three signs, it’s time to harvest. Use a sharp knife or pruning shears to cut the stem, leaving about 1–2 inches attached to the squash. This helps prevent rot during storage.
After harvesting, let the squash cure in the sun for 5–10 days. This process thickens the skin and concentrates the sugars, giving you the best possible flavor and storage life.
Remember, the key to a successful butternut squash harvest is patience and attention to detail. These three visual clues will guide you every time, ensuring you pick your squash at the perfect moment.
Once you master them, you’ll never second-guess your harvest again—just sweet, homegrown butternut squash ready for your table.
Butternut squash harvest timing: days to maturity and seasonal adjustments
Butternut squash typically takes 85–100 days to reach full maturity from planting, but your exact harvest window depends on variety, climate, and planting time. Early varieties like 'Waltham Butternut' mature in 75–85 days, while heirlooms like 'Giant Canadian' can stretch to 100+ days.
Understanding these timelines helps you avoid early frosts or overripe squash.
In USDA Zone 6a (like much of the Midwest), planting in late May after the last frost ensures a harvest in late September to October.
However, gardeners in warmer zones (8a+) can plant as early as March and harvest by July, while cooler zones (5a or below) may need to start seeds indoors for a timely fall harvest.
Your planting date directly impacts harvest timing. For a fall harvest, aim to plant 3–4 months before your first expected frost. In Zone 6a, that’s May 15–June 15.
If you’re in a shorter growing season, opt for fast-maturing varieties or use row covers to extend the season.
Adjust your planting schedule based on your local frost dates. For example, if your first frost arrives October 1, plant Waltham Butternut by June 15 to ensure a harvest before cold weather sets in.
Conversely, in Zone 10a, you can plant year-round and harvest every 2–3 months with succession planting.
Even with precise timing, seasonal adjustments are key. If summer temperatures exceed 90°F, squash may mature faster due to accelerated growth. Monitor vines closely and harvest as soon as they show ripe signs—like a hard rind and dried stem—to prevent overripening.
In cooler climates, use black plastic mulch to warm the soil and speed up maturity.
Pro tip: Mark your planting and harvest dates in a garden journal. Over time, you’ll refine your schedule to match your local microclimate, ensuring sweeter, longer-storing butternut squash every season. 🎃